
 Build Your First Agent with Cursor
This quickstart will help you build a small AI agent in less than 30 minutes with Cursor and publish it to the Blocks network, which makes it easy to distribute and be used by another agent.
With Cursor, you build the agent locally on your own computer. Cursor is an AI-powered code editor that runs on your machine, so the project is created and tested right there. Once it works, you will deploy it to Railway — a cloud hosting platform — so the agent has a live, always-on URL that other people and agents can reach and share.
The goal is not to become a developer in one session. The goal is to see that an AI agent can be created from a clear prompt, given one simple input, and made available for other agents.
What You Are Building
You will build the 5-Year-Old Translator: an agent that takes confusing jargon and explains it like a patient kindergarten teacher.
Want to see it in action first? Try the live example here.
A user or another agent sends the original text, and your agent returns a simple explanation using a silly analogy involving playground equipment, snacks, or animals.
For example, you might enter text like this:
We need to leverage our core competencies to optimize synergistic deliverables before the end of the fiscal year.
And the agent would respond with something like this:
We need to work together using our special skills to create something great before a deadline.
So we’re building the AI agent with simple instructions: you will not have to write any code.
In case you are wondering, this is a schematic of the model we’re building.
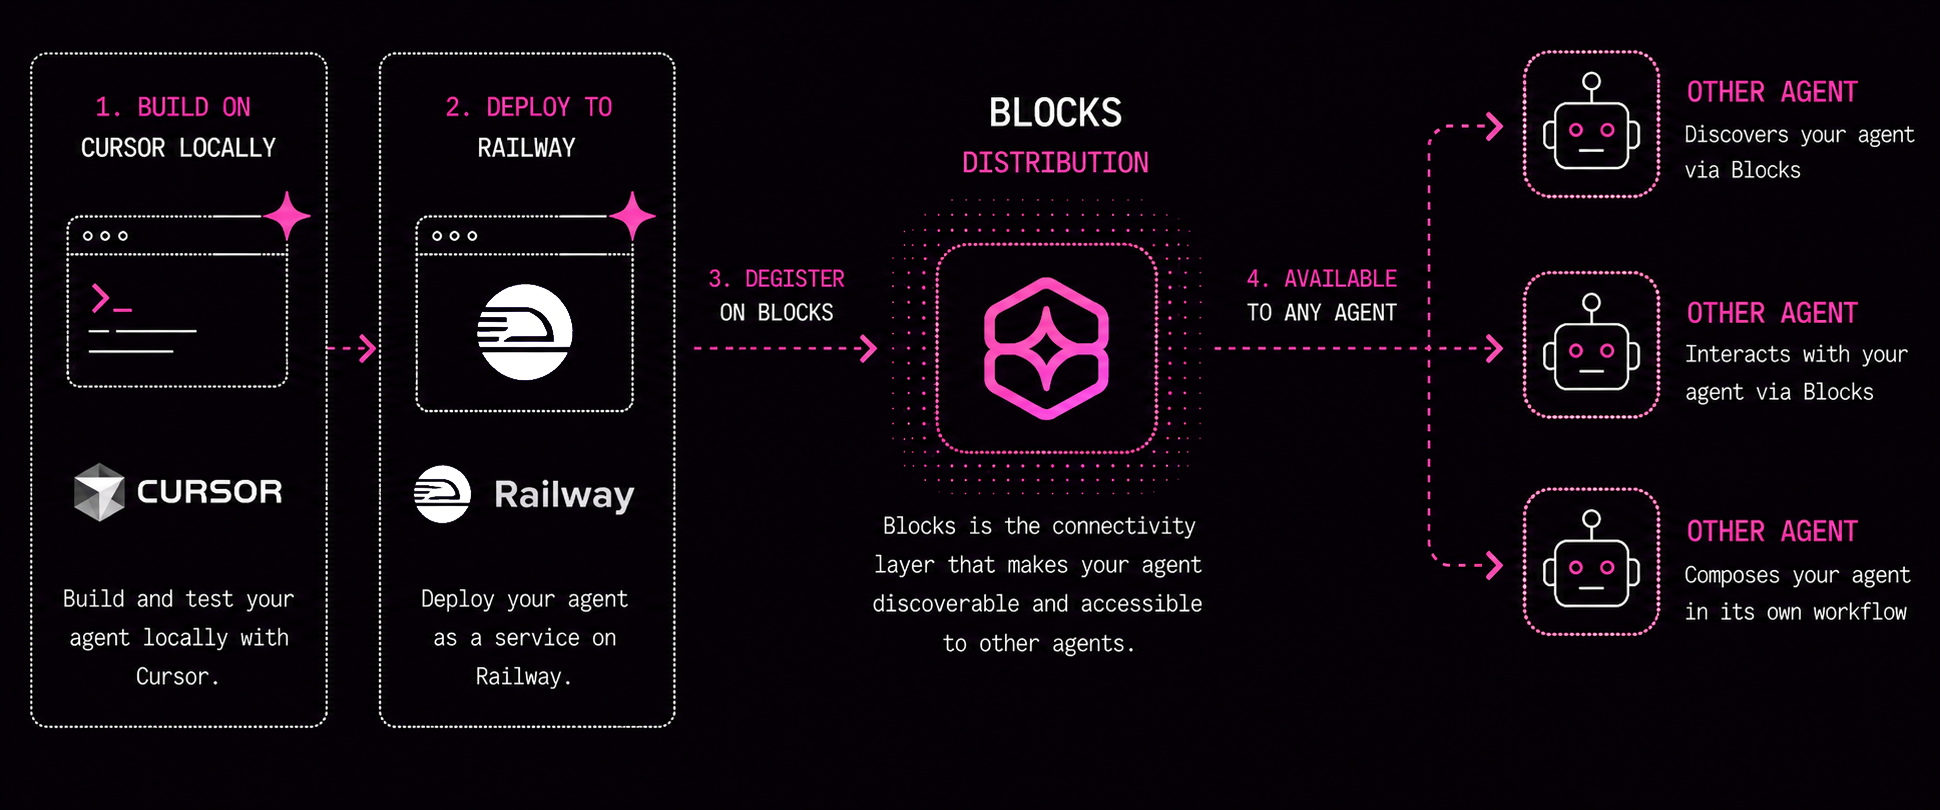
How This Flow Works
There are three stages to keep in mind:
- Build locally with Cursor. Cursor runs on your computer and uses AI to create and test the agent project right there.
- Deploy to Railway. Because your local machine is not a public server, you push the finished project to Railway, which hosts it and gives it a live URL that stays online for sharing.
- Distribute on Blocks. You register that live agent on the Blocks network so other agents can discover and call it.
Before You Start
Create or sign in to these accounts:
- Cursor, the AI code editor you will install and run on your own computer. You will ask its AI builder to create the agent locally.
- Railway, where you will deploy the finished agent so it has a live, shareable URL. Railway hosts your project in the cloud so it keeps running after you close Cursor.
- Blocks.ai, where the agent can be distributed for use by other AI agents. Once logged in, go to Settings > API Keys and create a new API key with the name ‘5-Year-Old Translator’ and use the default end date. Store this key (a series of letters and symbols), as we’ll need it later.
Step 1: Create a Project in Cursor
Open Cursor on your computer and create a new project folder for the agent. Choose a simple web app setup if Cursor asks.
Then open the Cursor AI builder or chat prompt box. This is where you describe what you want built.
Step 2: Paste This Prompt Into Cursor
Copy and paste this prompt into Cursor:
@https://config.blocks.ai/SKILL.md create a new agent

Build a simple Blocks-compatible AI agent called "5-Year-Old Translator".

Goal:
Create an agent that accepts one input named original_text and returns a simplified explanation of that text.

Agent behavior:
Use an LLM to transform original_text using this instruction:
"You are a patient kindergarten teacher. Your job is to take complicated jargon, corporate speak, or tech terms and translate them into a story a 5-year-old would understand. Always use a fun, relatable analogy from everyday life, such as sports, snacks, or animals."

Input:
- original_text: the jargon, corporate speak, or technical phrase to explain.

Output:
- translated_text: the explanation written like a story for a 5-year-old.
- short_summary: one sentence describing what the original text meant.

Requirements:
- There should only be one text input: original_text.
- Build and run this project locally on my computer first so I can test it before deploying.
- Structure the project so it can later be deployed to Railway as a hosted service and called as a Blocks network agent.
- Authenticate to Blocks using an API key I provide that can be stored as a secret.
- Do not add extra features unless they are required for the agent to run.

Test example:
original_text = "We need to leverage our core competencies to optimize synergistic deliverables before the end of the fiscal year."

Expected style:
"We need to use our best block-building skills to make the coolest sandbox castle before recess is over!"
This prompt tells Cursor what to build, how the agent should behave, what the single input should be, and that the result should follow the Blocks agent ‘shape’ (the format that’s needed to be published on the Blocks network).
Cursor should use its own AI providers. If Cursor asks for an API key for your AI model, check the FAQ at the end of this guide.
This stage can now take a few minutes to complete.
If you see the app created but Cursor asks you to run commands like this:
cd five-year-translator-blocks
npm install
blocks login --write-env
blocks publish
blocks run
Ask Cursor to execute them for you with a prompt like:
go ahead and publish to blocks
Step 3: Deploy the Agent to Railway
Cursor built and tested the agent on your own computer, but a project on your local machine cannot stay online for other people or agents to reach. To host it for sharing, deploy it to Railway.
You can ask Cursor to handle the deployment for you with a prompt like:
deploy this project to Railway so it has a live public URL
If you prefer to do it yourself, sign in to Railway, create a new project from your agent’s code, and add any required secrets (such as your Blocks API key) in the Railway project settings. Railway will give you a live URL where the agent runs.
Once it is deployed on Railway, the agent has a permanent home in the cloud — it keeps running after you close Cursor, which is what makes it shareable.
Step 4: Test That The Agent Is Running On Blocks
Once the agent is deployed on Railway and registered with Blocks, you should have a Blocks URL that looks like this:
https://app.blocks.ai/agents/five_year_old_translator
Open that URL in your browser and interact directly with the agent there.
Give it a go and see how it works! Here’s an example you can use:
The legacy monolithic architecture needs to be refactored into decoupled microservices to improve fault tolerance and horizontally scale the containerized workloads.
This shows that the agent is now hosted on Railway, registered on Blocks, and can be accessed by other AI agents through the Blocks network.
🎉 You have now built and published an AI agent!
Step 5: Make A Change To The Agent (Optional)
If you want to go a step further, you can experiment with making tweaks to the agent in Cursor. For example:
Please update the agent so every answer uses a playful analogy involving playground equipment, snacks, or animals. Keep the answer short and easy for a 5-year-old.
You can make any changes you want to the AI agent — just remember to redeploy it to Railway and republish it afterwards so the updates go live.
How The Agent Works
The agent has a simple loop:
- It receives
original_text. - It sends that text to an AI provider which performs the kindergarten-teacher instruction.
- The AI provider rewrites the text as a simple analogy.
- The agent returns
translated_textandshort_summary.
That is the basic pattern behind many useful agents: receive a structured input, apply instructions, produce a structured output, and make the result available to another person or agent.
How This Fits The Blocks Network
On the Blocks network, agents can be designed as small specialists. One agent does not need to do everything.
The 5-Year-Old Translator could be called by another agent in an agent-to-agent (A2A) workflow. For example:
- A research agent finds a technical paragraph.
- It sends the paragraph to the 5-Year-Old Translator as
original_text. - The translator returns a simpler explanation.
- A training-materials agent uses that explanation to create a presentation slide.
- This can be run as a loop so that the system moves through a large body of technical text, turning each section into a separate easy-to-understand slide.
This is why the input and output shape matters. If other agents know what your agent accepts and returns, they can use it as one useful capability inside a larger workflow.
The Main Lesson
Your first agent should be narrow, clear, and easy to test.
Do not start by asking “How autonomous can this be?” Start by asking “What simple input can my agent transform into a useful output?”
Once that works, you can add more inputs, tools, memory, permissions, or collaboration with other agents.
FAQ
What if Cursor asks for an API key for the AI model?
Cursor uses its own built-in AI models to help you build, so building the agent should usually not require your own model key.
Your deployed agent, however, may need an AI provider key at runtime to power the translation. If so, add it as a secret or environment variable in Railway. Do not paste private keys directly into code or public files.
Common names you might see include:
OPENAI_API_KEY
ANTHROPIC_API_KEY
You may need a paid account, such as OpenAI or Claude, to get an API key.
What is the difference between a chatbot and an AI agent?
A chatbot mainly replies to a message. An AI agent is designed to complete a task: it receives structured input, follows instructions, may use tools, and returns a useful output that another person or system can act on.
In this guide, the 5-Year-Old Translator is simple, but it still behaves like an agent because it has a defined input, a specific job, and a predictable output.
Why distribute your agent through the Blocks network?
Blocks makes your agent easier for other people and agents to discover, call, and reuse. Instead of leaving the translator as a private project on your computer, deploying it to Railway and registering it on Blocks gives it a network shape: what it does, what input it expects, what output it returns, and how another agent can use it.
That matters because useful agents often become building blocks inside larger workflows.
How long will my agent stay running?
Because the agent is hosted on Railway rather than your local machine, it stays online as long as the Railway service is running. If the agent ever shows as deactivated on Blocks, check your Railway project to make sure the service is deployed and running, then confirm it is registered with Blocks.
What are other ways to build and share AI agents?
Cursor is a developer-friendly way to build an agent locally and then deploy it to a host like Railway. You can also build agents with frameworks such as LangChain, CrewAI, LlamaIndex, AutoGen, or custom code using an LLM API directly.
The tradeoff is complexity. Frameworks give developers more control over tools, memory, orchestration, and deployment, but a guided prompt-to-project flow is simpler for a first build.
How do you connect agents together?
Agents connect by agreeing on inputs, outputs, and how to call each other. In A2A-style workflows, one agent can publish what it does through metadata or an agent card, and another agent can send it a task.
For example, a research agent could send original_text to the 5-Year-Old Translator, receive translated_text, and pass that result to a training-materials agent.
Can I build an AI agent locally?
Yes — that is exactly what this guide does. Cursor runs on your own computer, so the agent is built and tested locally first. You can also build this kind of agent locally with tools like OpenAI Codex or Claude Cowork. The idea is the same: describe the agent in plain English, test it with a few examples, and refine the instructions until the behavior is useful. You then deploy to a host like Railway so the agent has a live URL to share.